Electric conversion for my Fiat 500 – day 9
Today was a bad day for me, but a good day for you.
I had to undo and redo many of the things I did. You could avoid my mistakes and that's why I say today is good day for you.
I had to remove my secondary battery pack (from the back) as it went flat and I've mounted my primary battery pack to the front of my Fiat 500.

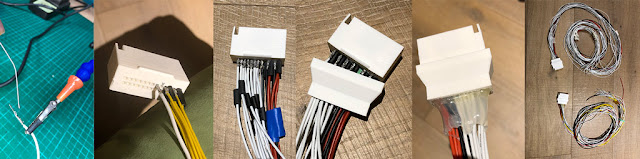
For the time being I charge my batteries on a "test bench" rather then on the car as I still need to figure out all the circuitry for on-board charging.
So.. may be the first advice is to figure out your charging connections first.
Other problems I have encountered appeared on the second day of tinkering with the primary battery pack which is recycled off modules of an i3 BMW.
Well, I've kept them in their aluminium case and overnight with the temperature changing a lot of water condensed on the aluminium surface.
That's bad when its mixed with 44 Volts or 88-90 Volts when you link the modules in series.


I had to remove the module again, let them dry in the kitchen and then I've wrapped sealed them in transparent PVC like film. The material is a sort of industrial cling film.
I will find a better solution with time, but the learning here is about sealing from condensation.

You may consider to remove the aluminium boxing for your project and keep the cells together with other means.
Breaking up the module in cells will allow you to optimise the space and weight distribution, so it's worth considering if you are at ease in tinkering with battery cells.
There is an interesting video on Youtube from Munro Live series, where they show their research on building casing for batteries which is lightweight and made of some plastic material.
My other problem was on the bracket and mounts to hold the batteries on the front bonnet.
I did a nice aluminium bracket that was meant to lock both modules and was anchored to the central stem in the body of the car that holds the boot lid hinge.
This solution wasn't practical as the single bracket is difficult to reach once the batteries are on so it was a bit of a risk to get the bolt tight.


I ended up building 2 other T shaped brackets to fit on the anchor point used to keep the fuel tank in place.
These brackets are one on the left and one on the right so you can easily bolt them on.
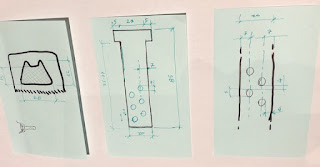
These anchoring points should be also stronger than the central stem bar holding the boot lid hinge.


The batteries on the front side of the car are held up on a beam like bar.
This aluminium bar solution keeps also the batteries up and creates just enough space under the modules to fit the on-board battery charger underneath.
In theory the on-board battery charger could be also fitted at the back of the car or not fitted at all if you are not planning to charge away from home.
Summarising...
- Figure out on-board charging before fitting the batteries.
- Seal in some way your batteries to protect from condensation.
- Plan for the brackets and mounts to keep your batteries in place.


Comments
Post a Comment